Hmm, that didn't work. Sorry, something went wrong our end. Try again – and if it persists, just email us at info@sharpn.co.uk.
We may use this information to send you occasional news and updates. You can, of course, unsubscribe at any time. For further information see our Privacy Policy.
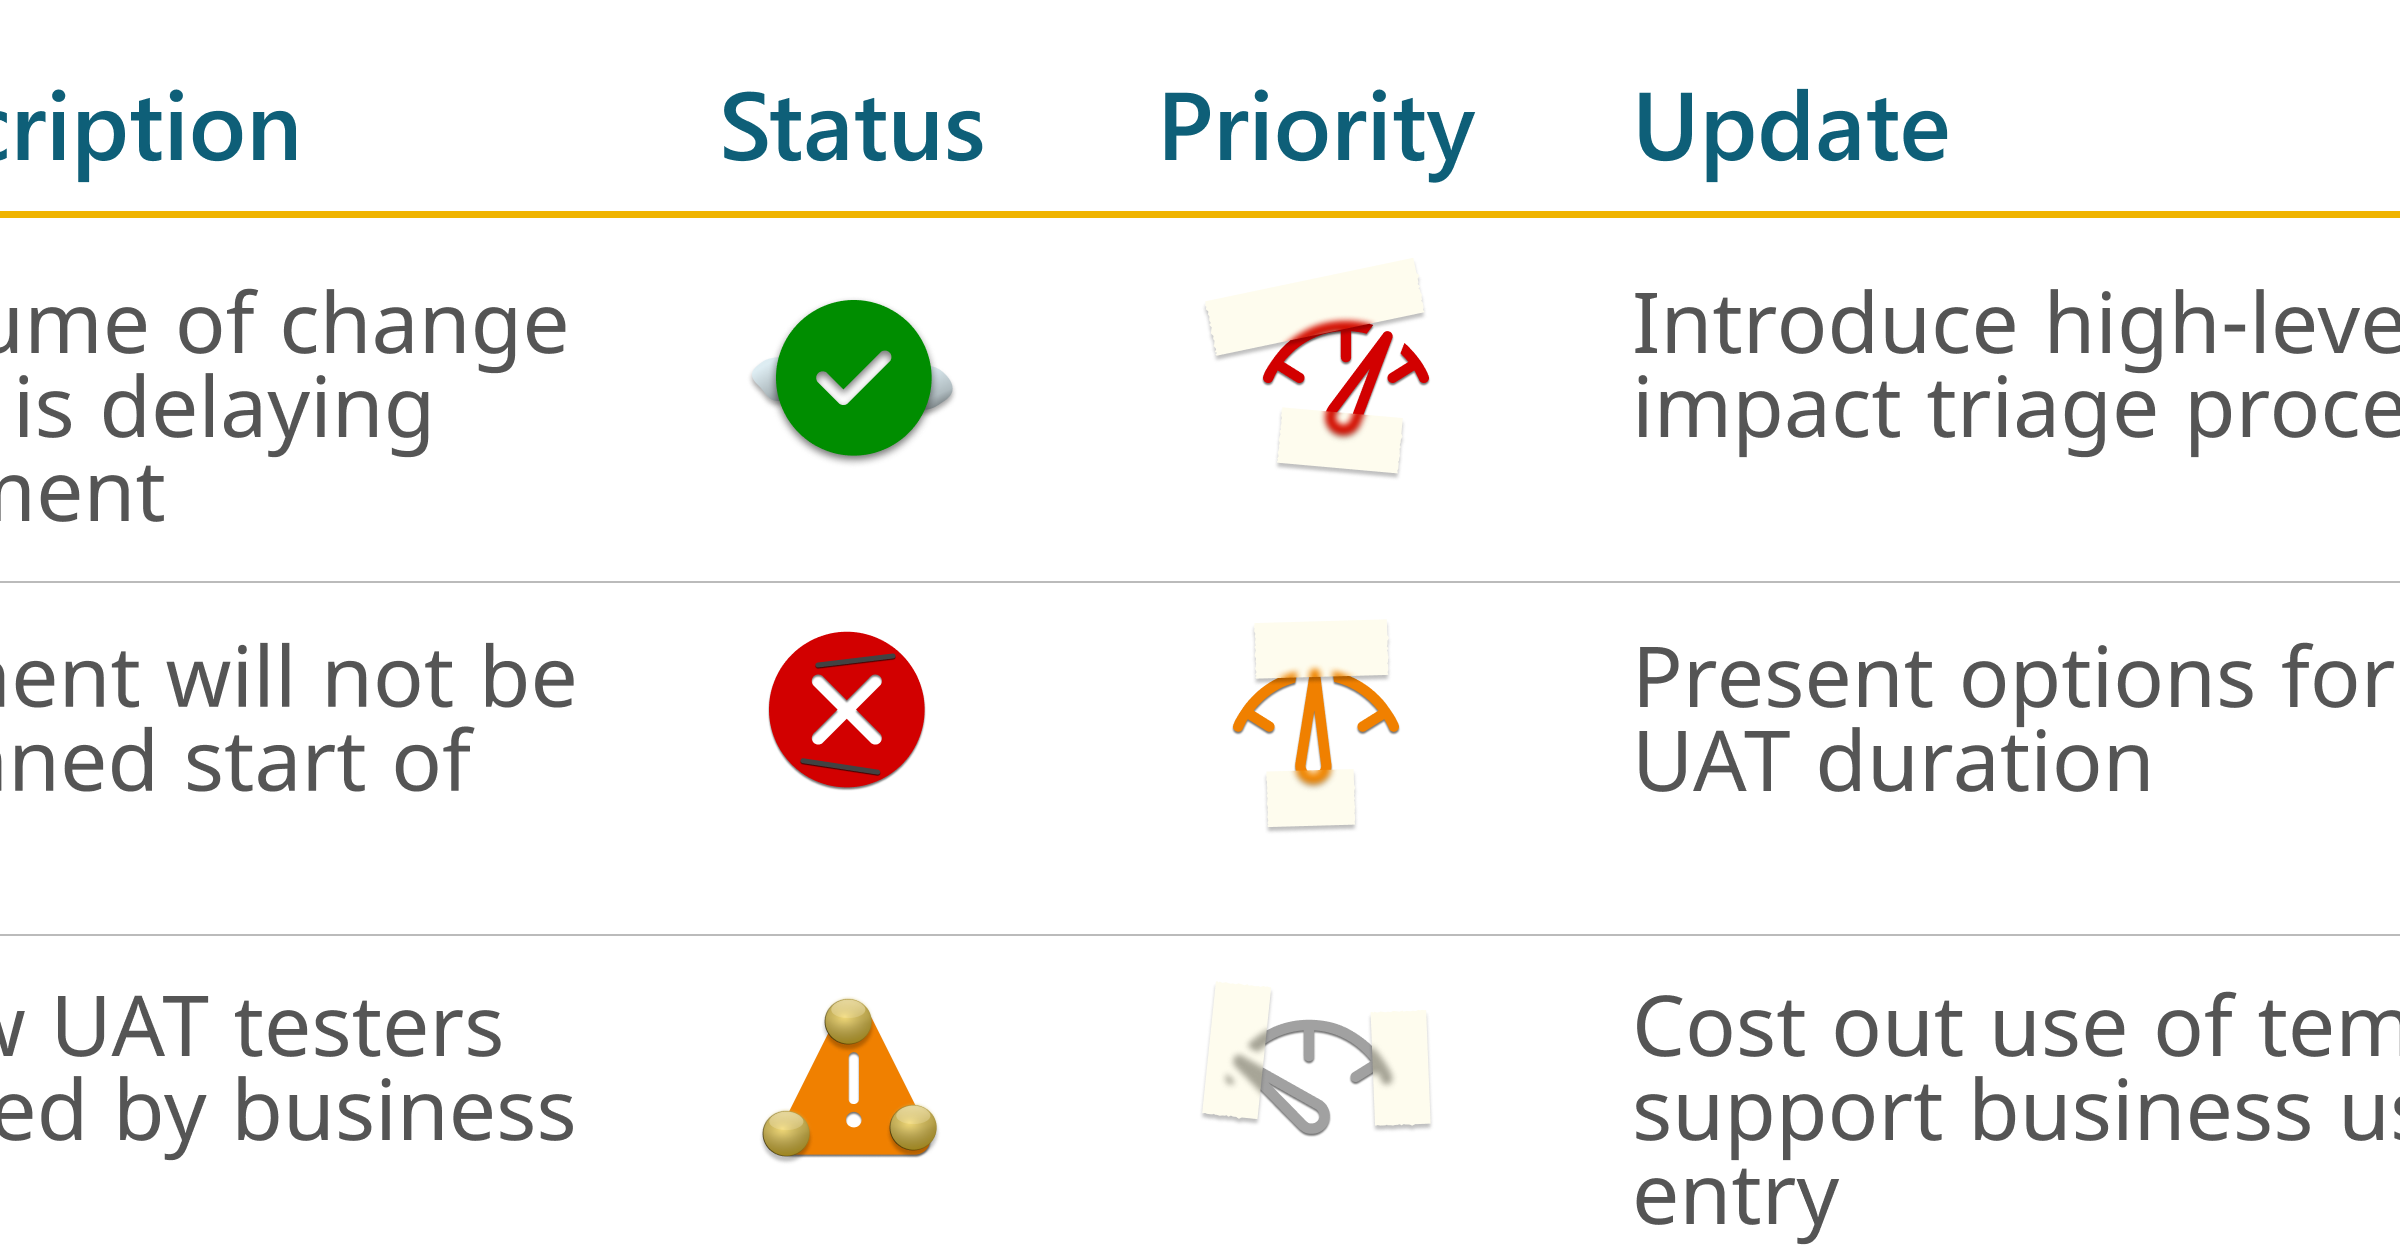
We use tables to arrange information so it is easier for readers to break down and understand. Anything we can do to make it simpler and quicker to process will help.
This is where icons come in. As a visual shorthand, they are inherently quicker than words. Even a tick or a cross is quicker than a ‘Yes’ or ‘No’, or even a ‘Y’ or ‘N’. They also take up less space, so your table is less cramped.
There are many situations where an icon could be used instead of a word – the following example shows some of the possibilities (although I wouldn’t recommend using quite so many in real life).
Another situation could be in an options comparison.
There’s a trick to aligning icons
I often see people inserting an icon as a graphic, and then manually placing it in the table. This is not ideal. Icons won’t auto-align to tables cells (it can be done but the effort involved is not really worth it). And if you have to resize the rows or columns, you’ll have to realign them manually and by eye. Frustrating.
Here’s the easy way to do it: use a symbol font.
A symbol font contain a set of icons you can insert directly into the table, like typing letters. And because they are characters – not graphics – they sit inside the table cell. Which means they align automatically, and move with the table.
Formatting them is easy:
To change the colour, use the font colour
To change the size, use the font size
Symbol fonts to use
Before we go into detail, a heads-up to Mac users: this is harder for you. See the section below about how to use these fonts.
The best font to use is Segoe Fluent Icons. This is a Microsoft font intended for application developers, but it’s got lots of useful symbols we can use in documents. There is also the older Segoe UI Symbol. This has less symbols, but does have the benefit of being a ‘cloud font’ which means it’s available equally to Window and Mac users.
Avoid using these fonts: Segoe UI Emoji, Symbol, Webdings, or Wingdings (any of the three sets).
Using symbol fonts
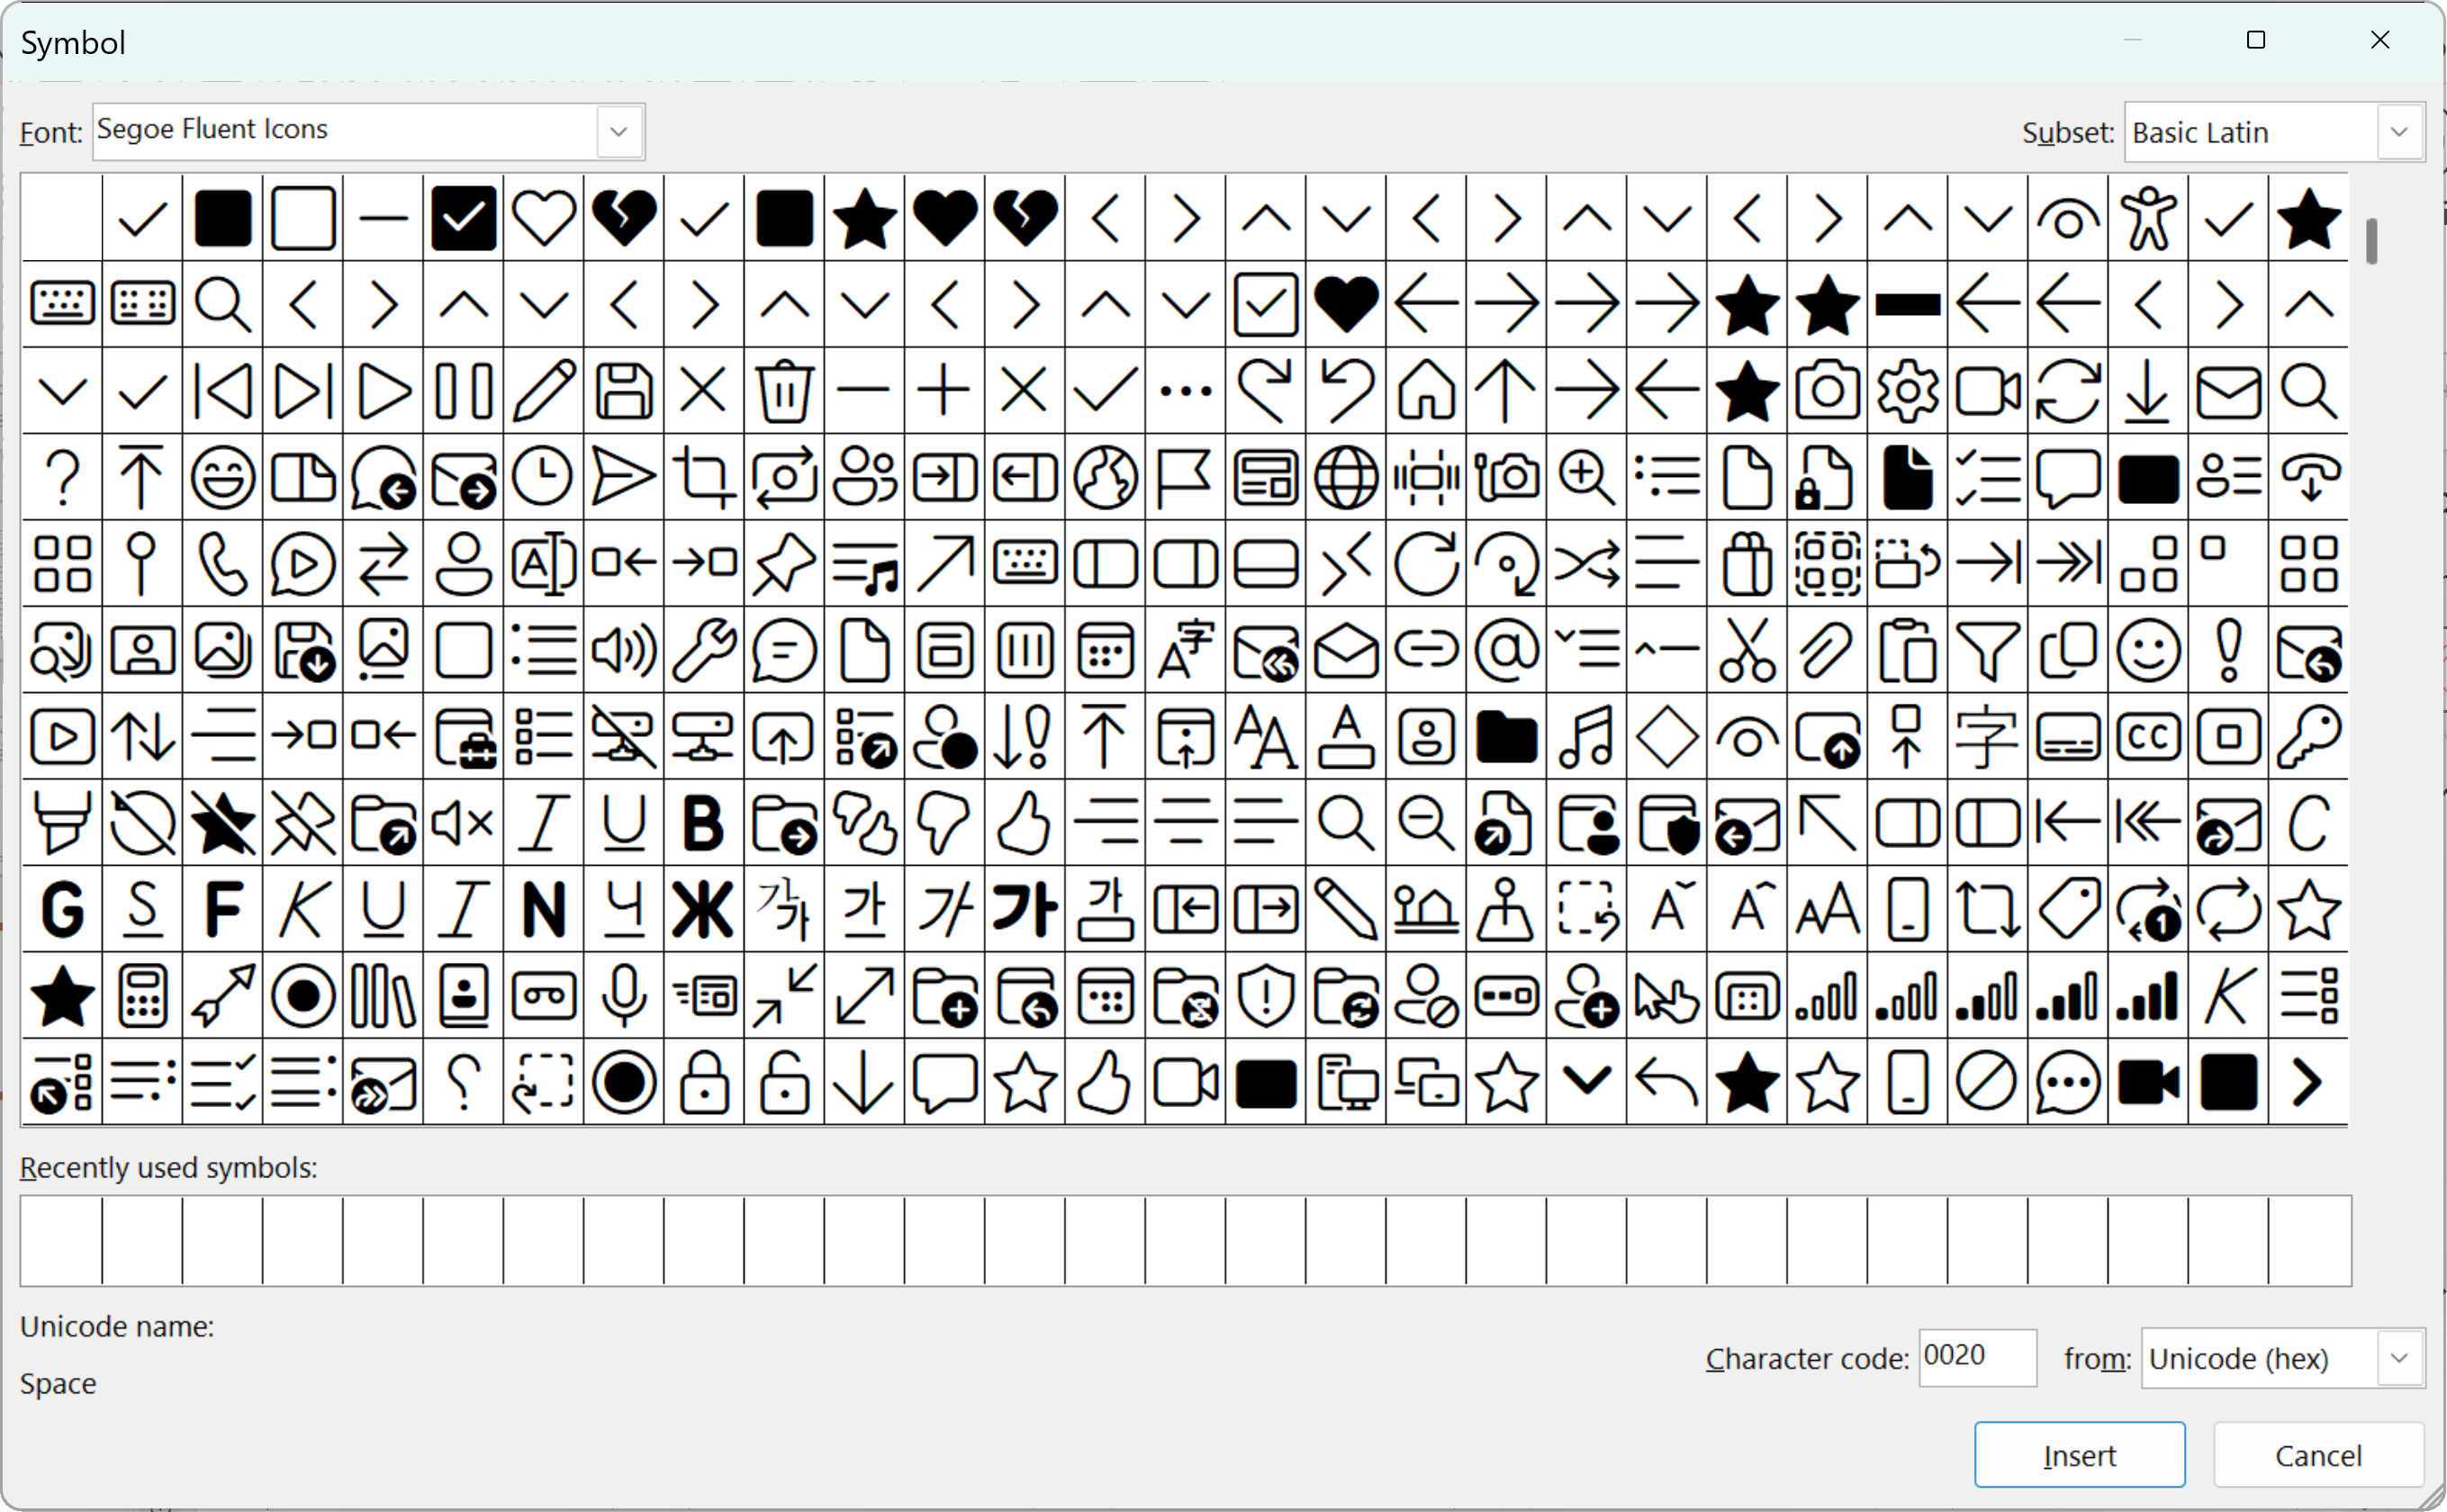
To insert a symbol character, go to the Insert tab and click Symbol.
This brings up the Symbol dialog box where you can select and and insert an icon.
Once you have inserted the symbol, just format and align it just like normal text. You may find you want to make it one or two font sizes bigger than the font size you are using for text. In this case, it might be useful to reduce the top and bottom margins for these cells.
When it comes to sharing the document, be aware of anyone who might be reading on a Mac, or on a mobile device. They may see rectangles or ?-mark characters instead of what you intended. It’s best to PDF the document to be sure it is seen correctly.
Selecting an icon to use
Be warned: there is no search functionality and it can be time-consuming scrolling up and down trying to spot the needle you need in the haystack. They don’t appear in any particularly obvious order.
So to make things a bit easier for you, I’ve curated a set of the icons that are likely to be the most useful. Download it at the link below. You can just copy and paste from this slide.
No items found.
No items found.
No items found.
No items found.
No items found.
No items found.
No items found.
No items found.
Get the Download
Watch-outs
Consider providing a key
The Curse of Knowledgeapplies here: you may know exactly what the icons mean. You chose them after all. But remember that your readers don’t - so if it isn’t 100% obvious, provide a key.
Emoji 🔣💡🛠️
Some icon fonts contain emoji, although these may not be that useful. Or you can just insert emoji directly: on Windows press Windows+. (i.e. the windows key with the full-stop/period key.)
But bear in mind that these will display using the emoji of the device or app they are viewed on. So they will look very different across Windows, Mac, iPhone and Android or on the web. We recommend you avoid these for all but fairly informal content.
What Mac users need to know
The use of symbols is very different on a Mac. You can’t access the same fonts. And be aware that any symbol that you choose might not work on Windows, so PDF is your friend again.
But there are some things you can do...
Install Segoe Fluent Icons
Microsoft has made Segoe Fluent Icons available as an open-source font. You can download it here. To access it, you have to open the Font Book app, select User on the left, find the font and the symbols you need and then copy into your document. (Here you have one advantage over Windows users: the Font Book allows you to search for symbols.)
Don’t forget it’s a custom font, so while the symbols will work for Windows users, they won’t work for other Mac users.
Use a custom bullet graphic
See below under Advanced stuff.
Advanced stuff
If you have a regular need for icons in tables but the available set isn’t working for you, there are a couple of other things you can do.
Use a custom symbol font
You could download and install a custom font, such as the excellent Font Awesome. If you do this, remember that other people almost certainly won’t have this font, so you will have to share as a PDF.
Use custom bullet graphics
This is a bit of a hack, but can be useful if you can’t find the symbol you need. Or if you want to make sure that the bullet will work on any other device. The basic process is that you find an icon the normal way, save it as a picture, then use that picture as a bullet. The picture is saved in the file, and there is no reliance on fonts.
It goes like this:
Find an icon in the normal way: Insert > Icons. Or use any other icon repository you have access to.
Convert the icon to a normal shape: Graphics > Convert to Shape. This removes any blank padding around the icon, which is unhelpful in what we are goign to do.
Colour the icon as you need now. You won’t be able to do it later.
Save the icon as a picture. Right-click > Save as Picture and choose SVG as the file type.
Go to where you want to place the icon. Type a single space. This is important - if there is no text, the bullet that we are about to create won’t appear.
Home > Bullets dropdown > Bullets and Numbering…
Click Picture
Find and select the image you saved in step 4 above. (Normally the file chooser will open in the same place you saved the icons).
Click Insert.
You can adjust the size of the picture in the Bullets and Numbering dialog. Or by changing the font size of the space character.
You may need to adjust the indents via the ruler (View > Ruler) or the paragraph settings.
To copy the icon to other cells, select the space character, copy and paste. Make sure you choose the ‘Keep Source Formatting’ Option.
Do you want to learn how to improve the quality of your documents so that they reflect the quality of your thinking? Talk to us to discuss how we can help.
And to accompany the course we have built a new Plan-on-a-page kit:
114 ready-built timelines to paste into your deck, each with custom drawing guides and pre-sized task shapes.
A 'sticker book' of useful shapes to help you quickly build clear, flexible and impressive plans that fit seamlessly into your stakeholder update decks